Showing posts with label The 3 R's. Show all posts

Friday, August 17, 2012

Storing Garden Onions


 I found a cheep way to store and prolong the life of my garden fresh Walla Walla onions. 
You got it!.........Pantyhose! No kidding. I purchased bran new hose at Walmart for $1.00 and cut the legs apart. After inserting each onion I tied a knot so the onions wouldn't touch each other. I don't want them to spoil each other by touching. I tied a loop knot at the top and suspended the onions in my basement food storage room.  It is a moderately dry area to store my onions. I really want them to last!  

Ahh...no more onions sitting on my counter.

 This variety of onion will only keep stored this way for a few weeks, 
but hey... It beats eating 30 huge onions in one day right?
 Hanging the onions separately and not on a surface allows for air to circulate through the onions. 
Now, whenever I am cooking with onions, I cut the hose right below the end of a knot and I have a delicious home grown onion ready to eat!

Friday, June 1, 2012

Refashioned Long Sleeved Blue Maternity Shirt

BEFORE...
Here is my lovely blue striped maternity shirt. 
The drawback?...I was pregnant in the summer with lots of long sleeved shirts to wear! 
Can you say  HOT!!!
AFTER!


So here is the process I went through to refashion this long sleeved shirt into a cool summer time maternity shirt.

I began refashioning this shirt by laying another maternity shirt on top as a template. 

After cutting off the sleeves and trimming the sides a bit the shirt had a nicely fitted maternity look.

After sewing the sides together, I ironed the sleeves under and sewed a straight hem for a finished look. 


FINISHED Product! Awe....cool for the Summer!


Red & Black Refashioned Maternity Blouse

Long Sleeved Maternity Blouse BEFORE & AFTER.


I was in need of summer shirts, so I went to my closet and thought hum...which one of these beauties needs a bit of refashioning? 
You guessed it...this baby! Out came this scissors and the sewing machine.
I placed a shirt on top of the blouse to be refashioned as my guide for the sleeve cut. Then I cut an inch below that line to insure adequate material for the hem on the sleeve. The first cut is always the hardest. ONCE that is over...the fun begins!
I ironed the sleeves under a couple times and then sewed a nice straight hem stitch.

All ready to go!

Now, a usable summer blouse for those not so cold days!

Monday, May 28, 2012

Love Shirt Refashioned

 BEFORE...
 I had this darling shirt for my little girl and I wanted to remove the peace sign.

After unpicking the peace sign I was ready to attach a fabric flower in its place.

 Using a needle and thread, I hand sewed the lacy flower onto the shirt. To make the flower, I layered circles of silk on top of each other and burned the edges with a candle flame. The flame singes the circular edges and makes a beautiful ruffle edged flower.

AFTER!
 My daughter loves this sweet shirt and the frilly flower.


Wednesday, April 18, 2012

DYI White and Orange Spring Wreath


I had a spring blossom tree I used each year as a Spring table decoration. The blossoms were falling off and I thought some of the twigs still looked good, so I used wire cutters and cut off each of the twigs to use in a wreath. The white blossoms made a perfect base for a Spring wreath.
The green stem above is what is left over from the tree and it went in the garbage. All the beautiful blossoms were reused in the wreath. I believe in the 3 R's.....so..... I reduced, reused, and recycled most of the spring tree decoration.

After wrapping each twig around the others I added a small twig of orange berries I had stashed in a box to give it a little spring color. Then I grabbed the only orange ribbon I own and tied a bow. Simple, yet perfect for spring.

Saturday, January 21, 2012

Pinwheel Baby Blanket

 This is the completed pin-wheel baby blanket!
 Here is the fabric scraps I began with. I added some fabric from Men's Dress shirts and cut them up into squares.
 After cutting the fabric into squares, I placed two fabric squares right sides together and sewed 2 parallel lines down the center. 
 Here are the parallel lines completely sewn.
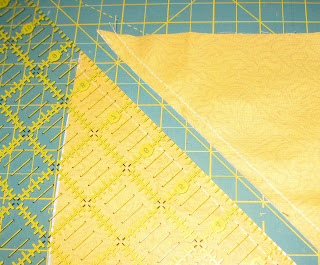
 Next, I used a fabric straight edge ruler and cut the center line. There are 2 triangles now. Once opened up, it looks like a square with 2 triangles of different colors stitched together. 
 Here is the front of the quilt when it was stitched together. 
 Then I sewed the hand made binding on to back side of the blanket. 
 I created my own binding out of my Brother-in-laws Dress shirt. I wanted to have a sentimental factor in the blanket, so that is why I used part of this men's dress shirt. Plus, I love to Reduce, Reuse and Recycle! I can't let a good thing go to waste.
I used my hands to stitch the binding onto the front side of the quilt. I like the hidden stitches and the added love into the blanket.
 Here is the completed blanket! Made with new material and some Men's Dress Shirts. 
 I backed the blanket in the similar pinwheel pattern and I loved how it turned out. 
 It was fun to try out a new quilt pattern and use up some fabric as well!
Here is a picture of the men's shirt and the completed blanket. The shirt was turned into binding.


A gift of time, is a gift of love!

Baby Boy Blue Patchwork Blanket

 I gave this blanket to a lovely family member who was having a baby boy. I constructed the quilt using some purchased material as well as some old shirts that my sister-in-law had given me. I wanted this blanket for their son to have some sort of sentimental value to it. By adding the parents clothing squares I was able to accomplish my goal.
Every baby needs a soft blanket!


Wednesday, November 9, 2011

Shabby Chic Headboard and Foot-board Makeover

Headboard BEFORE...
Headboard AFTER
Headboard before
 Footboard Before...


 Bedroom furniture primed and painted. So beautiful and Green! The Perfect color for a Shabby Chic little girls room. I love mixing some old furniture with a new bedspread.
This was an old canopy bed for my neighbors daughter. The furniture did not come with the canopy nor does my daughter need one. Although, I always dreamed of having one of my own when I was a little girl. The bed looks great without it. 
 The tall spindles make this bed really stand out in the room. My daughter loves it.

An added touch.
 A flower ball to hang on the spindle!